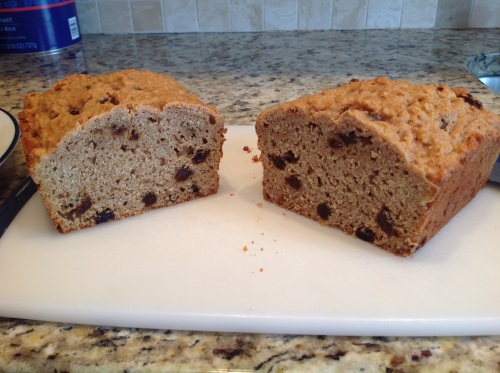
Cinnamon Raisin Quick Bread

You know when you buy a carton of buttermilk but you only use one or two cups and you don’t want the rest to go to waste? Well-now you have your answer! This quick bread is so delicious. We have been eating it plain, smeared with butter, topped with peanut butter and toasted with honey.

The original recipe calls for white sugar and white flour.  I easily replaced the white flour with white whole wheat flour but wasn’t sure what to use to replace the sugar.  I have been using honey a lot and that would probably have been delicious as well, but instead I wanted to try something with a slightly different flavor profile.  Jaggery! Jaggery is also known as coconut palm sugar.  Read more about jaggery here (thanks Wikipedia!).  This specific brand of jaggery I buy  is a very damp sugar, which is why I feel that you could easily replace it in the recipe with honey or even maple syrup.

feeding brian: cinnamon raisin quick bread

Cinnamon Raisin Quick Bread

Adapted from The Kitchn

Ingredients:

1 cup buttermilk

1 large egg

1/4 cup salted butter, melted

1/2 cup jaggery (palm sugar) or honey

2 cups white whole wheat flour

1 1/2 teaspoons baking powder

1/2 teaspoon baking soda

1 Tablespoon cinnamon

1/2 cup raisins

Directions:

1. Pre-heat oven to 325º.

2.Grease a 9 x 5 loaf pan with butter or spray with cooking spray.

3. Whisk together buttermilk, egg,  melted butter, and jaggery or honey.

4. Add in remaining ingredients and stir until well combined.

5. Pour batter into prepared pan and bake for 50-60 minutes.

6. Let bread cool in pan for a few minutes before turning it out on a wire rack to cool.

7. Slice and enjoy!

Makes 1 loaf, but recipe easily doubles (then freeze your extra loaf)

4 Comments

Filed under bread, breakfast, nut free, snack, toddler approved, vegetarian

Slow Cooker Chicken Stock

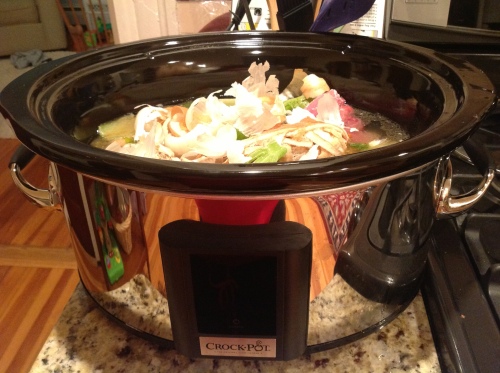
I typically make stock right after I cook a whole chicken in the slow cooker. After we have eaten and I have taken the rest of the meat off the chicken bones I put the bones and skin back into the slow cooker with the liquid that was leftover after cooking.  Yes, this is mainly fat, but it will add flavor to the stock and then it will be skimmed away later.  Next, add all those carrot peels and onions skins you have been saving.* This is also the time to add in the giblets you saved from inside the chicken.  Next, cover all this yummy goodness with about 8 cups of water.  I like to let my slow cooker cook on low for 10-12 hours.

In the morning, I turn the slow cooker off when I get up to allow the stock to cool a bit.  I then strain the stock, allow it to cool some more and put it in the fridge.

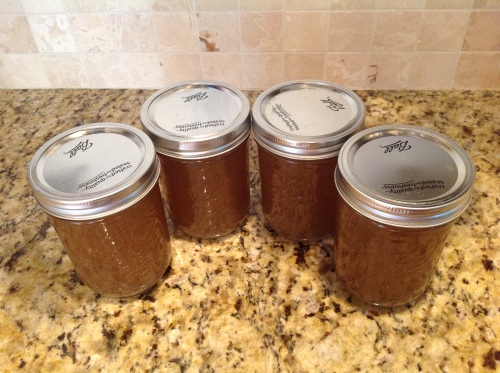
When I get home at night, I skim the fat off the top of the stock, then I put it into mason jars to store in the freezer.  That it, unless I plan on using it for another recipe later in the week.  Then I just store what I need in the fridge!

This chicken stock tastes a million times better than store bought and it is SO EASY to make. Enjoy!

cooking brian: slow cooker chicken stock

*Tip: any time you cut onions, celery, garlic, or peel carrots or parsnips, save all the skins and ends and peels in a bag in the freezer.  That way, when you are ready to make homemade stock, you won’t have to waste any vegetables, you will be able to use all these odds and ends.  You’re stock won’t taste exactly the same each time you make it, but it will still be delicious!

1 Comment

Filed under dairy free, egg free, gluten free, grain free, low sugar, nut free, paleo, slow cooker, soup, toddler approved

Whole Chicken in the Slow Cooker

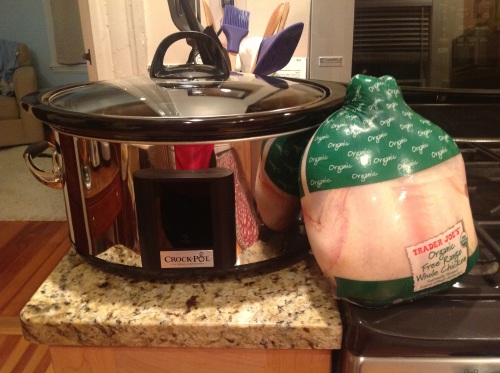
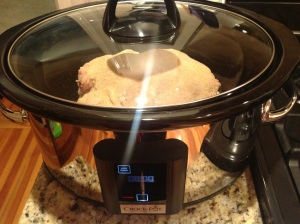
I LOVE my slow cooker and I am super excited because I just got this new Crock-Pot Slow Cooker after my old one died.  Slow cookers are amazing tools for busy cooks, and I love that I can set mine up in the morning and come home to an incredible meal after being at work all day.

Just about once a week, I cook up a whole organic chicken in the slow cooker.  Not only does that mean we have a delicious roast chicken dinner once a week but it also means that I can make sandwiches with the chicken for the rest of the week or use the chicken in another meal.  I love doing whole chickens in the slow cooker because it is easy and it gives me control over what I put on my chicken (as opposed to buying a rotisserie chicken at the store). I also have control over the type of meat I purchase.  The final reason why I LOVE roasting chickens in the slow cooker is because I then get to use all the bones and skin and other little non-edible bits to make my own chicken stock in the slow cooker.  Not only is homemade chicken stock better for you than the stuff in the cans or boxes, but it tastes a million times better too!

Whole Chicken in the Slow Cooker

This is more of a method rather than a recipe.  Please feel free to play around with it, add spices of your choosing and most importantly, have fun!

Ingredients:

1 5-6 lb chicken (preferably organic)

kosher salt

white pepper

garlic powder

onion powder

Directions:

1. In a clean sink, rinse chicken thoroughly.  Make sure to remove the giblets for a later use (chicken stock!). If you are not using the giblets right away, you can freeze them.

2. Pat the chicken dry with paper towels.

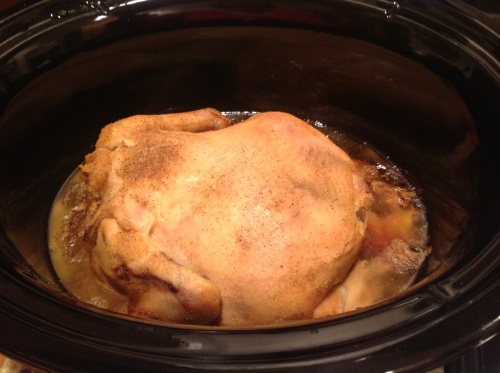
3. Place the chicken breast side down in the slow cooker.  I have done the chicken both ways, breast up and down.  I think that breast down keeps the breast more moist, but then the skin from the breast side will not get crisp.  It’s your call!

4. Generously sprinkle the chicken with seasonings.

5. Cover and cook your chicken for about 8 hours on low.  It is done when juices run clear.

6. Remove from slow cooker and enjoy! Mine usually falls apart a bit because it has been sitting on the warm setting for a while after it finishes cooking.  The presentation isn’t the most amazing but the taste is outrageous! 

DO NOT throw away the liquid in the bottom of the slow cooker or your bones, skin and other little bits of the chicken you are not going to eat once it is cooked.  This will all be a part of the slow cooker chicken stock.

9 Comments

Filed under dairy free, egg free, gluten free, grain free, low sugar, main dish, nut free, paleo, slow cooker, toddler approved

Soft and Chewy Oatmeal Raisin Bars

Hello there! It has been quite some time since I last posted but I am excited to be back! A lot has happened in the past year and a half.  I gave birth (yeah-thats him up there…all 14 amazing months of him!), we moved to Massachusetts, and both Brian and I got new jobs.  But, enough about me…on to the new recipe!

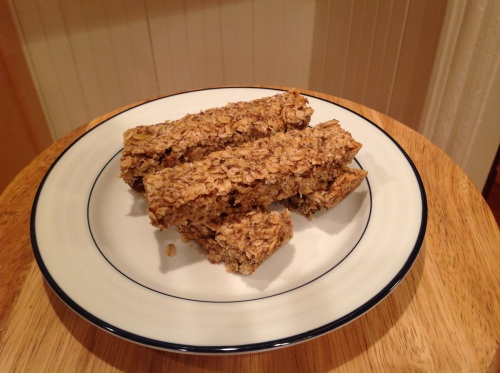
I have always made most of our food from scratch, but recently, I have become more committed to a clean eating lifestyle.  For the past few months I have been baking homemade granola bars for Brian to take with him to work and the baby loves them.  The problem is, the daycare the little monkey attends is a nut free zone and these granola bars are made with peanut butter.  So I set out to create a nut-free granola bar that the monkey and the rest of the family would enjoy and could take to school/daycare.  Well-the little man highly approves of these bars and so does Brian!

While technically these are granola bars, we all think they taste like oatmeal raisin cookies! Enjoy!

Soft and Chewy Oatmeal Raisin Bars

 Ingredients:

1/2 cup coconut oil, melted

2 medium ripe bananas, mashed

1 teaspoon pure vanilla extract

1/2 cup raw honey

4 cups old fashioned rolled oats

scant 1/2 cup white whole wheat flour

1 teaspoon baking soda

1/3 cup ground flaxseed

1/2 cup unsweetened shredded coconut

1/2 cup raisins

1 Tablespoon cinnamon

Directions:

1. Pre-heat oven to 325 °F and line a 9 x 13 baking dish with parchment paper.

2. In a large bowl, mix all wet ingredients together.

3. Add dry ingredients and mix until combined.  Do not worry about over mixing.

4. Press mixture into lined pan and bake for 25 minutes.

5. Allow bars to cool completely before cutting (makes 16-24 bars…I usually cut it into 20 which lasts the three of us about a week!)

2 Comments

Filed under dairy free, egg free, nut free, snack, toddler approved, vegetarian

Spinach Egg Cups

I love eggs! Particularly now that I’m pregnant, I have been eating eggs almost every morning for breakfast.  They are low carb, gluten free, full of protein and good for the little one growing inside me!

Brian and I were having a friend over for breakfast and I wanted to make an egg dish that I had never made before.  Brian thinks it’s funny that I often try out new dishes on company before trying them out on just him, but it usually seems to work!  I have always wanted to bake eggs in cups because then you don’t have to watch over them on the stove or take care to put them carefully into poaching liquid.  So I did a little research on baking eggs in cups and found a whole bunch of recipes that looked appealing.  I took a few ideas from others and then added in my own twists. If you would like to make these dairy free, just leave out the cheese and they will still be delicious!

It would be easy to play around with this recipe…I was thinking of doing an egg baked with tomato or one with mushrooms.  You could add all sorts of different spices or different cheeses to change things up a bit as well.  So many possibilities!

For the brunch we had:  spinach egg cups, blueberry multigrain pancakes, maple apple chicken sausage and fruit salad.

FYI-these still taste great re-heated the next day for breakfast (although the yolk will firm up a bit more).

Spinach Egg Cups

Ingredients:

1-2 T extra virgin olive oil
3 garlic cloves, minced
12 oz baby spinach (2 bags)
4 eggs
Grated Parmigiano-Reggiano cheese
Salt
Red pepper flakes to taste

1. Preheat oven to 350.

2. Spray 4 ramekins with cooking spray. Set aside.

3. Heat oil in large pan over med high heat. Add garlic and cook for 30 seconds. Add spinach to pan. Turn heat down to medium and cook until all spinach is wilted. Salt spinach to taste.

4. Divide spinach into ramekins.

5. Crack an egg over each pile of spinach.

6. Sprinkle tops with grated cheese and red pepper flakes (if desired).

7. Place ramekins inside of a small glass baking dish.

8. Bake for 20-25 minutes. Yolks will be runnier at 20 and firmer at 25.

~Serve with toast or eat on its own~

2 Comments

Filed under breakfast, gluten free, grain free, low sugar, nut free, vegetarian

Garlic Scape Soup

Garlic scapes are the jewels of late spring/early summer.  Scapes are the “flower stalks” of hard neck garlic plants.  Farmers cut off the scapes so they do not inhibit the growth of the bulb.  Scapes are beautiful and delicious and can be found at farmer’s markets this time of year.  Read more about scapes here.

I discovered garlic scapes last year at the Montclair Farmer’s Market and have been waiting patiently for them to reappear at my new local market in Sunnyside.  Low and behold, they did!  There are a lot of different scape recipes out there on the good ol’ internet that I want to try such as scape pesto and scape carbonara.

However, I have an amazing cookbook, Super Natural Cooking, by Heidi Swanson of 101 Cookbooks.  I constantly leaf through this cookbook, staring at the gorgeous photographs and dreaming of making every recipe.   One recipe has been on my mind for quite some time now-Garlic Scape Soup.  It is a simple recipe that yields a fantastically green-colored luscious soup.  Unfortunately, when I went to make the soup, I realized that I only had half the amount of garlic scapes that I needed, so I made a few substitutions.  The soup was still delicious! I definitely recommend buying this book (or her newer cookbook, Super Natural Every Day) and making this soup!

I served this soup alongside some crusty bread and a caprese salad.  A delicious, light, vegetarian summer meal!

The next time I make this soup I want to drizzle a bit of truffle oil over the top courtesy of The Filling Station.

Garlic Scape Soup

adapted just slightly from Super Natural Cooking by Heidi Swanson

Ingredients:

2 tablespoons extra virgin olive oil
1 dozen garlic scapes, chopped
3 garlic cloves, minced
3-4 scallions, chopped
3 large russet potatoes, unpeeled and cut into 1/2–inch pieces
5 cups vegetable stock
3 large handfuls baby spinach leaves
juice of ½ a lemon
kosher salt and black pepper to taste
¼ cup half & half

Directions:

1. Heat olive oil in a large soup pot over medium heat, then add the scapes and sauté for 2 minutes.  Add the garlic and scallions and sauté for 1 additional minute.

2. Add the potatoes and stock, bring to a boil, then reduce heat, cover, and simmer for about 20 minutes or until the potatoes are cooked through.

3. Remove from heat, add the spinach and puree using a hand blender. (I was at my mom’s house and she does not have a hand blender.  I had to use her food processor, which worked fine.  Just make sure to process the soup in batches so the hot liquid doesn’t come squirting out and burn you.)

4. Season soup with lemon juice, salt and pepper.

5. Stir in the half & half.

6. Pour into bowls and serve!

Leave a comment

Filed under gluten free, grain free, low sugar, main dish, soup, vegetarian

Orange Almond Cake

Hello fantastic readers! First of all, I want to apologize for not posting in quite awhile.  The past few months have been quite hectic from moving back to New York to still commuting to New Jersey for work to this.   I am now in New York for good with no more commuting and a new teaching job in Brooklyn! Yay! That gives me a whole lot more time to think about cooking and sharing recipes.

I have been thinking a lot about different recipe ideas for the blog, particularly since it is summer or “summer-spring” as my 5-year-old nephew called it, what with all the rain and cool weather we’ve been having recently.   Things like: Grilled Corn and Black Bean Salad, Southwestern Gazpacho, Gigantes and Salt-Kissed Buttermilk Cake…all recipes I will post in the near future.  Since finding out that I am pregnant, I have not been eating 100% gluten free, although I still cook many gluten free meals.  With that in mind, I will be posting some gluten free foods as well as things that may contain gluten.  (I will be sure to post disclaimers for gluten-filled food.)

Onto the recipe!  I have seen this recipe for Orange Almond Cake many times. But never had the gall to try it…whole boiled oranges? Really? But let me tell you, this is one outrageously, moist, delicious, just sweet enough cake that needs no frosting or hoopla.   Brian is a big fan of this cake and so were the lovely ladies at my book club and one of their beautiful toddler-aged daughters.

The orignal recipe can be attributed to Claudia Roden who is a UK-based cookbook writer who was born in Egypt in the 1930s.  There are slight variations of this recipe all over the internet and I made my own slight revisions as well.

The first time I made the cake I baked it in a 9 x 13 inch glass Pyrex dish.  The second time I made the cake I halved the recipe and baked it in an 8-inch round cake pan.  Both times the cake came out great.  With the Pyrex I left it in the pan and cut out squares and with the cake pan I lined the bottom with parchment and unmolded the cake, which worked quite well (see picture).

As a side note-this cake can be made Kosher for Passover if you remove the baking powder.  I have seen some posts where they whip the eggs whites and fold in the yolks to give the cake more volume after removing the baking powder…let me know if you try this method!  I think this cake tastes even better the second day so feel free to make it a day in advance.

Enjoy!

Orange Almond Cake

Ingredients

2 medium oranges, seedless if you can get them
6 eggs
1 cup sugar
1 ½ tsp baking powder
1 ½ cups almond flour, packed

Method

1. Pre-heat oven to 350. Lightly grease and line a 9 x 13 inch cake pan with parchment. Or, if you are going to serve it from the pan, save your parchment for another day and just lightly grease the pan.

2. Wash the oranges and place in a large pot.  Cover with water, bring to a boil and reduce heat to a simmer.  Simmer the oranges for about 2 hours, making sure not to let the water cook all the way down and burn the bottom of the pan (thanks to Brian and OxiClean for taking care of that little mishap!).

3. Once oranges are cooked, allow them to cool.  Then cut them open, remove any seeds and as much of the pith as possible. Then, skin and all, puree the oranges in a food processor.

4. Measure out 1 ¼ cups of the puree. The rest can be kept in the fridge for the next cake OR it will probably freeze well if another cake is not likely in the near future.

5. Beat the eggs, sugar and baking powder with an electric mixer or whisk until thickened and pale in color.

6. Add in the almond flour and mix in well.

7. Fold in the orange puree until combined.

8. Pour into prepared pan and bake for about 35-40 minutes.  The cake is ready when a skewer comes out clean.

9. Let cool for 10 minutes before turning out or cool to room temperature before slicing and serving.

2 Comments

Filed under dessert, gluten free, grain free, vegetarian

Black and White Cookies

Brian and I just moved back to New York! Yahoo!  Which is why I haven’t posted in a bit AND why this post is about Black and White Cookies.  Black and white cookies are the quintessential New York dessert.  In my quest to come up with a gluten free black and white I started to do a little investigative work into how the original black and white cookies were created.  From one of my favorite food blogs, Smitten Kitchen, I discovered that black and whites were originally made by adding extra flour to leftover cake batter at bakeries.

I decided that this would be my plan of action.  I found a great cake recipe using coconut flour at The Spunky Coconut and made just a few changes to it.  I added less egg and a little more coconut flour as well as subbing agave for honey and grapeseed oil for coconut oil for a more buttery flavor.

While the bottom cake-part of these cookies are fairly healthy, gluten free and lower carb, the tops are pure sugar!  I took recipes from The Joy of Baking and Smitten Kitchen and combined them a bit to create what I believe is vanilla sugary goodness and chocolate sugary goodness on top of the cookie.

These cookies were heartily approved by gluten eaters in my house and at my school!  Enjoy!

Cookie

In the food processor place:

2 cups cooked white beans
5 eggs
1 tsp pure vanilla extract
1/2 tsp pure lemon extract
1/3 cup agave

Puree well.

Add to food processor:

1/4 cup grapeseed oil
1/3 cup + 2 Tablespoons coconut flour
1/2 tsp kosher salt
1 tsp baking soda
1 1/2 tsp baking powder

Puree well.

Pre-heat oven to 350°F.  Line 2 baking sheets with parchment paper.  Using a ¼ cup measure, place batter 2 inches apart on the baking sheets. Bake for 18-23 minutes until lightly golden brown.  Place on a wire rack to cool before frosting.  Makes 14 cookies.

Frosting

4 cups confectioners sugar
1/3-1/2 cup hot water
2 Tablespoons light corn syrup
1 tsp vanilla
3 oz. semi-sweet chocolate disks or chips
2 Tablespoons unsweetened cocoa

Place the confectioners sugar in a large bowl. Gradually stir in the hot water, corn syrup, and vanilla extract, stirring constantly, until the mixture is thick, smooth, and of spreading consistency. Add more sugar or water if necessary to get the right consistency.  Remove about 1/2 cup of the frosting and place it in another heatproof bowl.

Spread vanilla frosting on half of the flat side of each cookie.  Leave cookies on a wire rack for frosting to set. While frosting is setting…

Add the finely chopped chocolate and cocoa powder to the frosting that has been set aside. Place the bowl over a saucepan of simmering water until the chocolate has melted and the frosting is smooth. Add extra water if frosting is too thick.  Remove from heat.

Spread chocolate frosting on second half of the cookie.  Leave cookies on a wire rack for the chocolate frosting to fully set.

Enjoy these cookies within a few days as the cake will start to dry out!

Leave a comment

Filed under dessert, gluten free, vegetarian

Ginger Teff Muffins

Mmmmm….muffins.  Have I already shared how much I like muffins?  I think I may have back in my post about my lemon blueberry muffins I made with almond flour.  One of the reasons I love muffins so much these days is that I have a hard time eating a real breakfast in the morning, what with being a teacher and getting up so early.  Muffins are the perfect on the go breakfast food, as long as they are not laden with sugar.  For me, muffins need to pack some nutritional and delicious goodness into each bite to be worth eating.

If you have ever eating Ethiopian food, you have had Teff flour.  It is the main ingredient in injera, the Ethiopian flatbread served alongside delicious meats and vegetables and is used in place of silverware.  You can read more about teff HERE. (Thanks Wikipedia!)

You can purchase teff flour at Whole Foods and I buy my arrowroot powder from Penzey’s Spices.  Enjoy!

Ginger Teff Muffins

Ingredients

1/2 cup plus 2 Tablespoons teff flour
1/4 cup arrowroot flour
1/2 teaspoon baking soda
1 teaspoon cinnamon
2 teaspoons ginger
1/2 teaspoon kosher salt
2 Tablespoons grapeseed oil
4 Tablespoons water
1 teaspoon vanilla
2 Tablespoons agave
4 Tablespoons molasses
2 eggs, lightly beaten
2 medium overripe bananas, mashed

Directions

1. Pre-heat oven to 350°F.  Spray 6 muffin cups with non-stick cooking spray.  If using a 12-muffin cup tin, use the outside edges.

2. In a medium mixing bowl stir together teff flour, arrowroot powder, baking soda, cinnamon, ginger and salt.

3. Make a well in the middle of the dry ingredients.  Add oil, water, vanilla, agave, molasses, eggs and banana to the center of the bowl.  Stir all ingredients together to combine.  Do not over mix. The mixture will be liquidy.

4. Evenly distribute batter between 6 muffin tins.  The tins will be full to the top.

5. Bake muffins for 25 minutes or until a toothpick comes out clean. Enjoy!

3 Comments

Filed under bread, breakfast, gluten free, nut free, snack, vegetarian

Mediterranean Stuffed Peppers

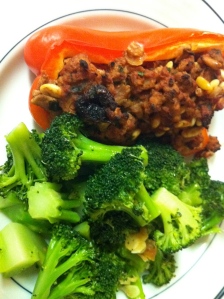
For Brian’s birthday a number of years back, I made a huge Mediterranean feast.  We both love Mediterranean food: salty feta, briny olives, creamy tzatziki, flavorful meats and fishes.  I created a whole menu based on our love for these foods which included my first attempt at stuffed peppers.  I got the original recipe from The Essential Mediterranean Cookbook which I received as a present from a co-worker a number of years ago during a holiday present swap.  These peppers were filled with the flavors of the Mediterranean: rice, olive oil, quality tomatoes, currants, parsley, pine nuts.  The flavors were a lovely balance of sweet and savory.  They came out beautifully and everyone seemed to love them.

Recently, we have been eating a lot less carbs during dinner and I wanted to make a stuffed pepper that reflected our eating changes.  I swapped out the rice for lean ground turkey and decreased the olive oil significantly from the original recipe.  What resulted was a sweet-savory protein packed dinner.  I served it with garlic broccoli.

Mediterranean Stuffed Peppers

Ingredients

2 large red bell peppers
2 ounces pine nuts
1 Tablespoon Extra Virgin Olive Oil
1 large onion, chopped
1-1.3 pounds lean ground turkey
1 cup strained tomato (or no salt added tomato puree)
3 Tablespoons parsley, chopped
½ cup dried cherries or currants
1 teaspoon cinnamon
Salt to taste

Directions

Pre-heat oven to 350

1. Toast pine nuts in a large sautee pan over medium heat.  Stir frequently to prevent burning.  Remove from pan and set aside.

2. In the same pan, still on medium heat, add the olive oil, chopped onion, and a pinch of salt. Sautee 5-10 minutes or until soft and lightly browned.

3. Push the onions to the side of the pan and add the ground turkey.  As the turkey begins to cook, break it up and mix it in with the onions.  Cook turkey until no pink remains.

4. Add strained tomato, parsley, dried cherries, cinnamon, pine nuts and a pinch of salt.  Cook down together on medium heat for about 10 minutes.

5. While mixture is cooking, cut peppers lengthwise and remove seeds and ribs. Spray a glass baking dish with cooking spray and place the peppers in the dish.

6. Divide meat mixture equally among the 4 pepper halves.  The mixture will be slightly overflowing.

7. Bake for 30-35 minutes or until peppers are tender.

8. Enjoy!

Serves 4

Leave a comment

Filed under dairy free, egg free, gluten free, grain free, low sugar, main dish